
Regression with 3D images
Contents
# Uncomment this cell if running in Google Colab
!pip install clinicadl==1.6.1
Regression with 3D images#
The objective of the regression is to learn the value of a continuous variable given an image. The criterion loss is the mean squared error between the ground truth and the network output. The evaluation metrics are the mean squared error (MSE) and mean absolute error (MAE).
3D image tensor extraction with the prepare-data pipeline#
Before starting, we need to obtain files suited for the training phase. This pipeline prepares images generated by Clinica to be used with the PyTorch deep learning library (Paszke et al., 2019). Four types of tensors are proposed: 3D images, 3D patches, 3D ROI or 2D slices.
The prepare-data pipeline selects the preprocessed images, extracts the
“tensors”, and writes them as output files for the entire images, for each
slice, for each roi or for each patch.
The following command will perform this extraction, at the image-level:
clinicadl prepare-data image <caps_directory> <modality>
where:
caps_directoryis the folder containing the results of thet1-linearpipeline and the output of the present command, both in a CAPS hierarchy.modalityis the name of the preprocessing performed on the original images. It can bet1-linearorpet-linear. You can choose custom if you want to get a tensor from a custom filename.
Output files are stored into a new folder (inside the CAPS) and follows a structure like this:
deeplearning_prepare_data
├── image_based
└── t1_linear
└── sub-<participant_label>_ses-<session_label>_T1w_space-MNI152NLin2009cSym_desc-Crop_res-1x1x1_T1w.pt
Files are saved with the .pt extension and contains tensors in PyTorch format. A JSON file is also stored in the CAPS hierarchy under the tensor_extraction folder:
CAPS_DIRECTORY
└── tensor_extraction
└── <extract_json>
These files are compulsory to run the train command. They provide all the details of the processing performed by the prepare-data command that will be necessary when reading the tensors.
(If you failed to obtain the preprocessing using the t1-linear pipeline,
please uncomment the next cell)
!curl -k https://aramislab.paris.inria.fr/clinicadl/files/handbook_2023/data_adni/CAPS_example.tar.gz -o oasisCaps.tar.gz
!tar xf oasisCaps.tar.gz
To perform the feature extraction for our dataset, run the following cell:
!clinicadl prepare-data image data_adni/CAPS_example t1-linear --extract_json image_regression_t1
At the end of this command, a new directory named deeplearning_prepare_data is
created inside each subject/session of the CAPS structure. If you failed to
obtain the extracted tensors please uncomment the next cell.
!curl -k https://aramislab.paris.inria.fr/clinicadl/files/handbook_2023/data_adni/CAPS_extracted.tar.gz -o oasisCaps_extracted.tar.gz
!tar xf oasisCaps_extracted.tar.gz
!tree -L 3 data_adni/CAPS_example/subjects/sub-ADNI005S*/ses-M00/deeplearning_prepare_data/
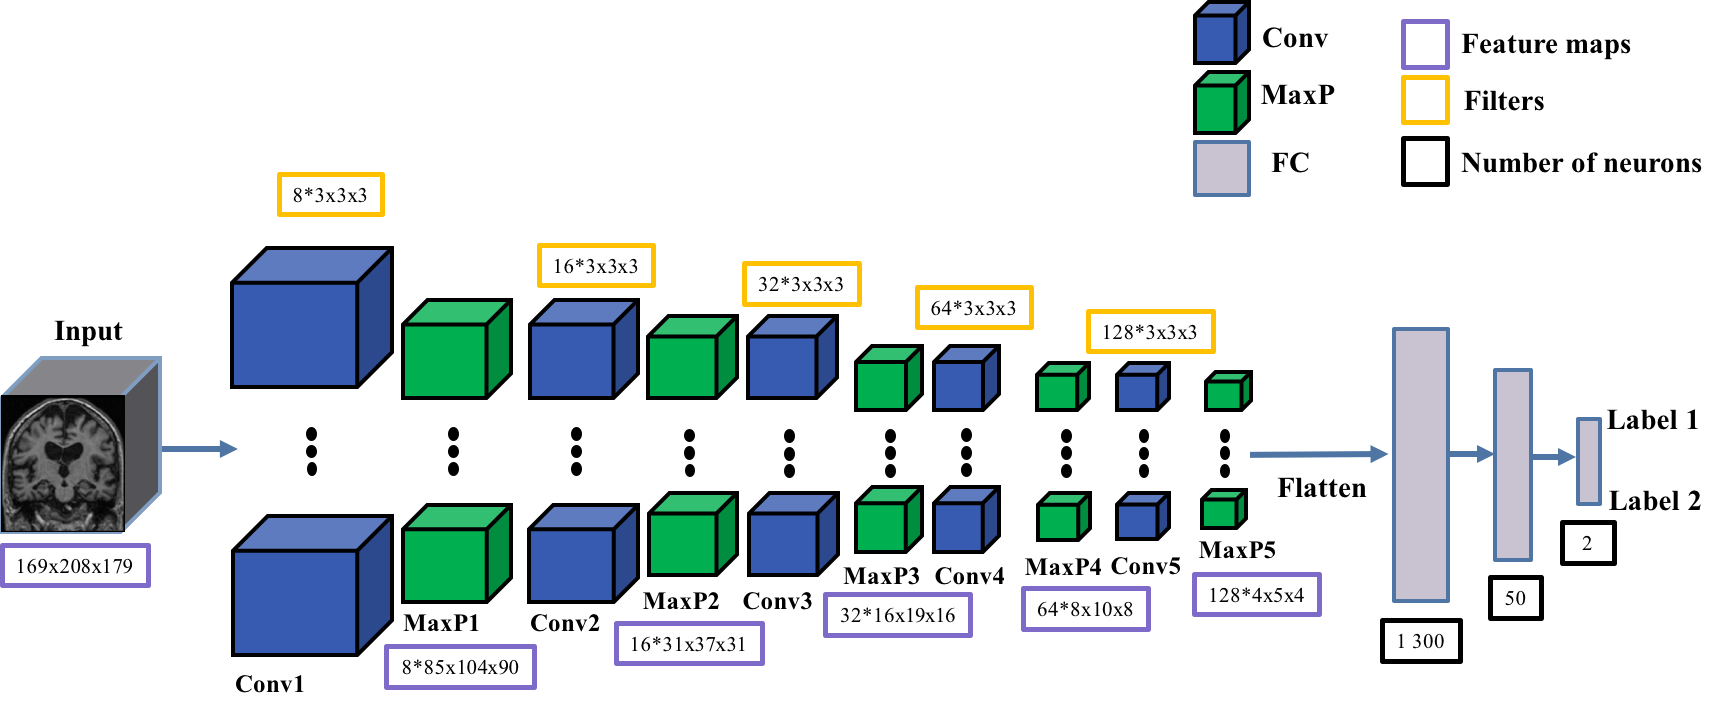
ClinicaDL uses the Conv5_FC3 convolutional network for inputs of type 3D
image-level. This network is composed of:
5 convolutional layers with kernel 3x3x3,
5 max pooling layers with stride and kernel of 2 and a padding value that automatically adapts to the input feature map size.
3 fully-connected layers.
Before starting#
Warning
If you do not have access to a GPU, training the CNN may require too much time. However, you can execute this notebook on Colab to run it on a GPU.
If you already know the models implemented in clinicadl, you can directly
jump to the train custom to implement your own custom experiment!
from pyrsistent import v
import torch
# Check if a GPU is available
print('GPU is available: ', torch.cuda.is_available())
Data used for training#
Because they are time-costly, the preprocessing steps presented in the beginning of this tutorial were only executed on a subset of OASIS-1, but obviously two participants are insufficient to train a network! To obtain more meaningful results, you should retrieve the whole OASIS-1 dataset and run the training based on the labels and splits performed in the previous section. Of course, you can use another dataset, but then you will have to perform again “./label_extraction.ipynb” the extraction of labels and data splits on this dataset.
clinicadl train REGRESSION#
This functionality mainly relies on the PyTorch deep learning library [Paszke et al., 2019].
Different tasks can be learnt by a network: classification, reconstruction
and regression, in this notebook, we focus on the regression task.
Prerequisites#
You need to execute the clinicadl tsvtools get-labels and clinicadl tsvtools {split|kfold}commands prior to running this task to have the correct
TSV file organization. Moreover, there should be a CAPS, obtained running the
preprocessing pipeline wanted.
Running the task#
The training task can be run with the following command line:
clinicadl train regression [OPTIONS] CAPS_DIRECTORY PREPROCESSING_JSON \
                TSV_DIRECTORY OUTPUT_MAPS_DIRECTORY
where mandatory arguments are:
CAPS_DIRECTORY(Path) is the input folder containing the neuroimaging data in a CAPS hierarchy. In case of multi-cohort training, must be a path to a TSV file.PREPROCESSING_JSON(str) is the name of the preprocessing json file stored in theCAPS_DIRECTORYthat corresponds to theclinicadl extractoutput. This will be used to load the correct tensor inputs with the wanted preprocessing.TSV_DIRECTORY(Path) is the input folder of a TSV file tree generated byclinicadl tsvtool {split|kfold}. In case of[multi-cohort training, must be a path to a TSV file.OUTPUT_MAPS_DIRECTORY(Path) is the folder where the results are stored.
The training can be configured through a TOML configuration file or by using the command line options. If you have a TOML configuration file you can use the following option to load it:
--config_file(Path) is the path to a TOML configuration file. This file contains the value for the options that you want to specify (to avoid too long command line).
If an option is specified twice (in the configuration file and, as an option, in the command line) then the values specified in the command line will override the values of the configuration file.
A few options depend on the regression task:
--label(str) is the name of the column containing the label for the regression task. It must be a continuous variable (float or int). Default: age.--selection_metrics(str) are metrics used to select networks according to the best validation performance. Default: loss.--loss(str) is the name of the loss used to optimize the regression task. Must correspond to a Pytorch class. Default: MSELoss.
Please note that the purpose of this notebook is not to fully train a network because we don’t have enough data. The objective is to understand how ClinicaDL works and make inferences using pretrained models in the next section.
# Training for regression on the age
!clinicadl train regression -h
!clinicadl train regression data_adni/CAPS_example image_regression_t1 data_adni/split/4_fold data_adni/maps_regression_image --n_splits 4
The clinicadl train command outputs a MAPS structure in which there are only two data groups: train and validation. A MAPS folder contains all the elements obtained during the training and other post-processing procedures applied to a particular deep learning framework. The hierarchy is organized according to the fold, selection metric and data group used.
An example of a MAPS structure is given below
<maps_directory>
├── environment.txt
├── split-0
│       ├── best-loss
│       │       ├── model.pth.tar
│       │       ├── train
│       │       │       ├── description.log
│       │       │       ├── train_image_level_metrics.tsv
│       │       │       └── train_image_level_prediction.tsv
│       │       └── validation
│       │               ├── description.log
│       │               ├── validation_image_level_metrics.tsv
│       │               └── validation_image_level_prediction.tsv
│       └── training_logs
│               ├── tensorboard
│               │       ├── train
│               │       └── validation
│               └── training.tsv
├── groups
│       ├── train
│       │       ├── split-0
│       │       │       ├── data.tsv
│       │       │       └── maps.json
│       │       └── split-1
│       │               ├── data.tsv
│       │               └── maps.json
│       ├── train+validation.tsv
│       └── validation
│               ├── split-0
│               │       ├── data.tsv
│               │       └── maps.json
│               └── split-1
│                       ├── data.tsv
│                       └── maps.json
└── maps.json
You can find more information about MAPS structure on our documentation
Inference#
(If you failed to train the model please uncomment the next cell)
!curl -k https://aramislab.paris.inria.fr/clinicadl/files/handbook_2023/data_adni/maps_regression_image.tar.gz -o maps_regression_image.tar.gz
!tar xf maps_regression_image.tar.gz
The predict functionality performs individual prediction and metrics
computation on a set of data using models trained with clinicadl train or
clinicadl random-search tasks.
It can also use any pretrained models if they are structured like a
MAPS
Running the task#
This task can be run with the following command line:
clinicadl predict [OPTIONS] INPUT_MAPS_DIRECTORY DATA_GROUP
where:
INPUT_MAPS_DIRECTORY (Path) is the path to the MAPS of the pretrained model.
DATA_GROUP (str) is the name of the data group used for the prediction.
Warning
For ClinicaDL, a data group is linked to a list of participants / sessions and a CAPS directory. When performing a prediction, interpretation or tensor serialization the user must give a data group. If this data group does not exist, the user MUST give a caps_directory and a participants_tsv. If this data group already exists, the user MUST not give any caps_directory or participants_tsv, or set overwrite to True.
!clinicadl predict -h
!clinicadl predict data_adni/maps_regression_image 'test-adni' --caps_directory <caps_directory> --participants_tsv data_adni/split/test_baseline.tsv
Results are stored in the MAPS of path model_path, according to the
following file system:
model_path>
    ├── split-0
    ├── ...
    └── split-<i>
        └── best-<metric>
                └── <data_group>
                    ├── description.log
                    ├── <prefix>_image_level_metrics.tsv
                    ├── <prefix>_image_level_prediction.tsv
clinica predict produces a file containing different metrics (accuracy,
balanced accuracy, etc.) for the current dataset. It can be displayed by
running the next cell:
import pandas as pd
metrics = pd.read_csv("data_adni/maps_regression_image/split-0/best-loss/test-Oasis/test-OASIS_slice_level_metrics.tsv", sep="\t")
metrics.head()