# Uncomment this cell if running in Google Colab
# !pip install clinicadl==0.2.1
Train your own models
This section explains how to train a CNN on OASIS data that were processed in the previous sections.
Warning
If you do not have access to a GPU, training the CNN may require too much time. However, you can execute this notebook on Colab to run it on a GPU.
If you already know the models implemented in clinicadl, you can directly jump to the last section to implement your own custom experiment!
import torch

# Check if a GPU is available
print('GPU is available', torch.cuda.is_available())
Because they are time-costly, the preprocessing steps presented in the beginning of this tutorial were only executed on a subset of OASIS-1, but obviously two participants are insufficient to train a network! To obtain more meaningful results, you should retrieve the whole OASIS-1 dataset and run the training based on the labels and splits performed in the previous section.
Of course, you can use another dataset, but then you will have to perform again the extraction of labels and data splits on this dataset.
Introduction
Input types
In this notebook the goal is to train a classifier to differentiate the AD label from the CN label based on the associated T1-MR images. These images were preprocessed according to the section on preprocessing.
According to the literature review done in (Wen et al., 2020), 4 main paradigms were implemented to train a CNN to perform a classification task between AD and CN labels based on T1-MRI. These paradigms depend of the input given to the network:
2D slices,
3D patches,
ROIs (3D patches focused on a region of interest),
3D images.
Architectures
There is no consensus in the literature on the architecture of the models that should be used for each input category. Part of the studies reviewed in (Wen et al., 2020) used custom models, and the others reused architectures that led to good results on natural images (VGGNet, ResNet, GoogleNet, DenseNet…).
We chose to find custom architectures by running a search on the main architecture components (more details can be found in section 4.3 of (Wen et al., 2020)). This architecture search was run only on the train + validation sets, and no test sets were used to choose the best architectures. This is crucial, as the use of a test set during architecture search can lead to biased, over-optimistic, results.
Training networks with clinicadl
The training tasks can be performed using clinicadl:
clinicadl train <input_type> <network_type> <caps_directory> \
                <preprocessing> <tsv_path> <output_directory> <architecture>
where:
input_typeis the type of input used. Must be chosen betweenimage,patch,roiandslice.network_typeis the type of network trained. The possibilities depend on theinput_type, but the complete list of options isautoencoder,cnnormulticnn.caps_directoryis the input folder containing the results of the t1-linear pipeline.preprocessingcorresponds to the preprocessing pipeline whose outputs will be used for training. Current version only supportst1-linear.t1-extensivewill be implemented in next versions of clinicadl.tsv_pathis the input folder of a tsv file tree generated byclinicadl tsvtool {split|kfold}.output_directoryis the folder where the results are stored.architectureis the name of the architecture used (for example,Conv5_FC3).
Depending on your computational resources, you should adapt the parameters in the Computational resources argument group:
-
-cpuforces the system to use CPU instead of looking for a GPU. -
--nproc Nsets the number of workers (parallel processes) in the DataLoader to N. -
--batch_size Bwill set the batch size to B. If the batch size is too high, it can raise memory errors.
Tip
You can increase the verbosity of the command by adding -v flag(s).
2D slice-level CNN
An advantage of the 2D slice-level approach is that existing CNNs which had huge success for natural image classification, e.g. ResNet (He et al., 2016) and VGGNet (Simonyan and Zisserman, 2014) , can be easily borrowed and used in a transfer learning fashion. Other advantages are the increased number of training samples as many slices can be extracted from a single 3D image, and a lower memory usage compared to using the full MR image as input.This paradigm can be divided into two different frameworks:
single-CNN: one CNN is trained on all slice locations.
multi-CNN: one CNN is trained per slice location. For multi-CNN the sample size is smaller (equivalent to image level framework), however the CNNs may be more accurate as they are specialized for one slice location.
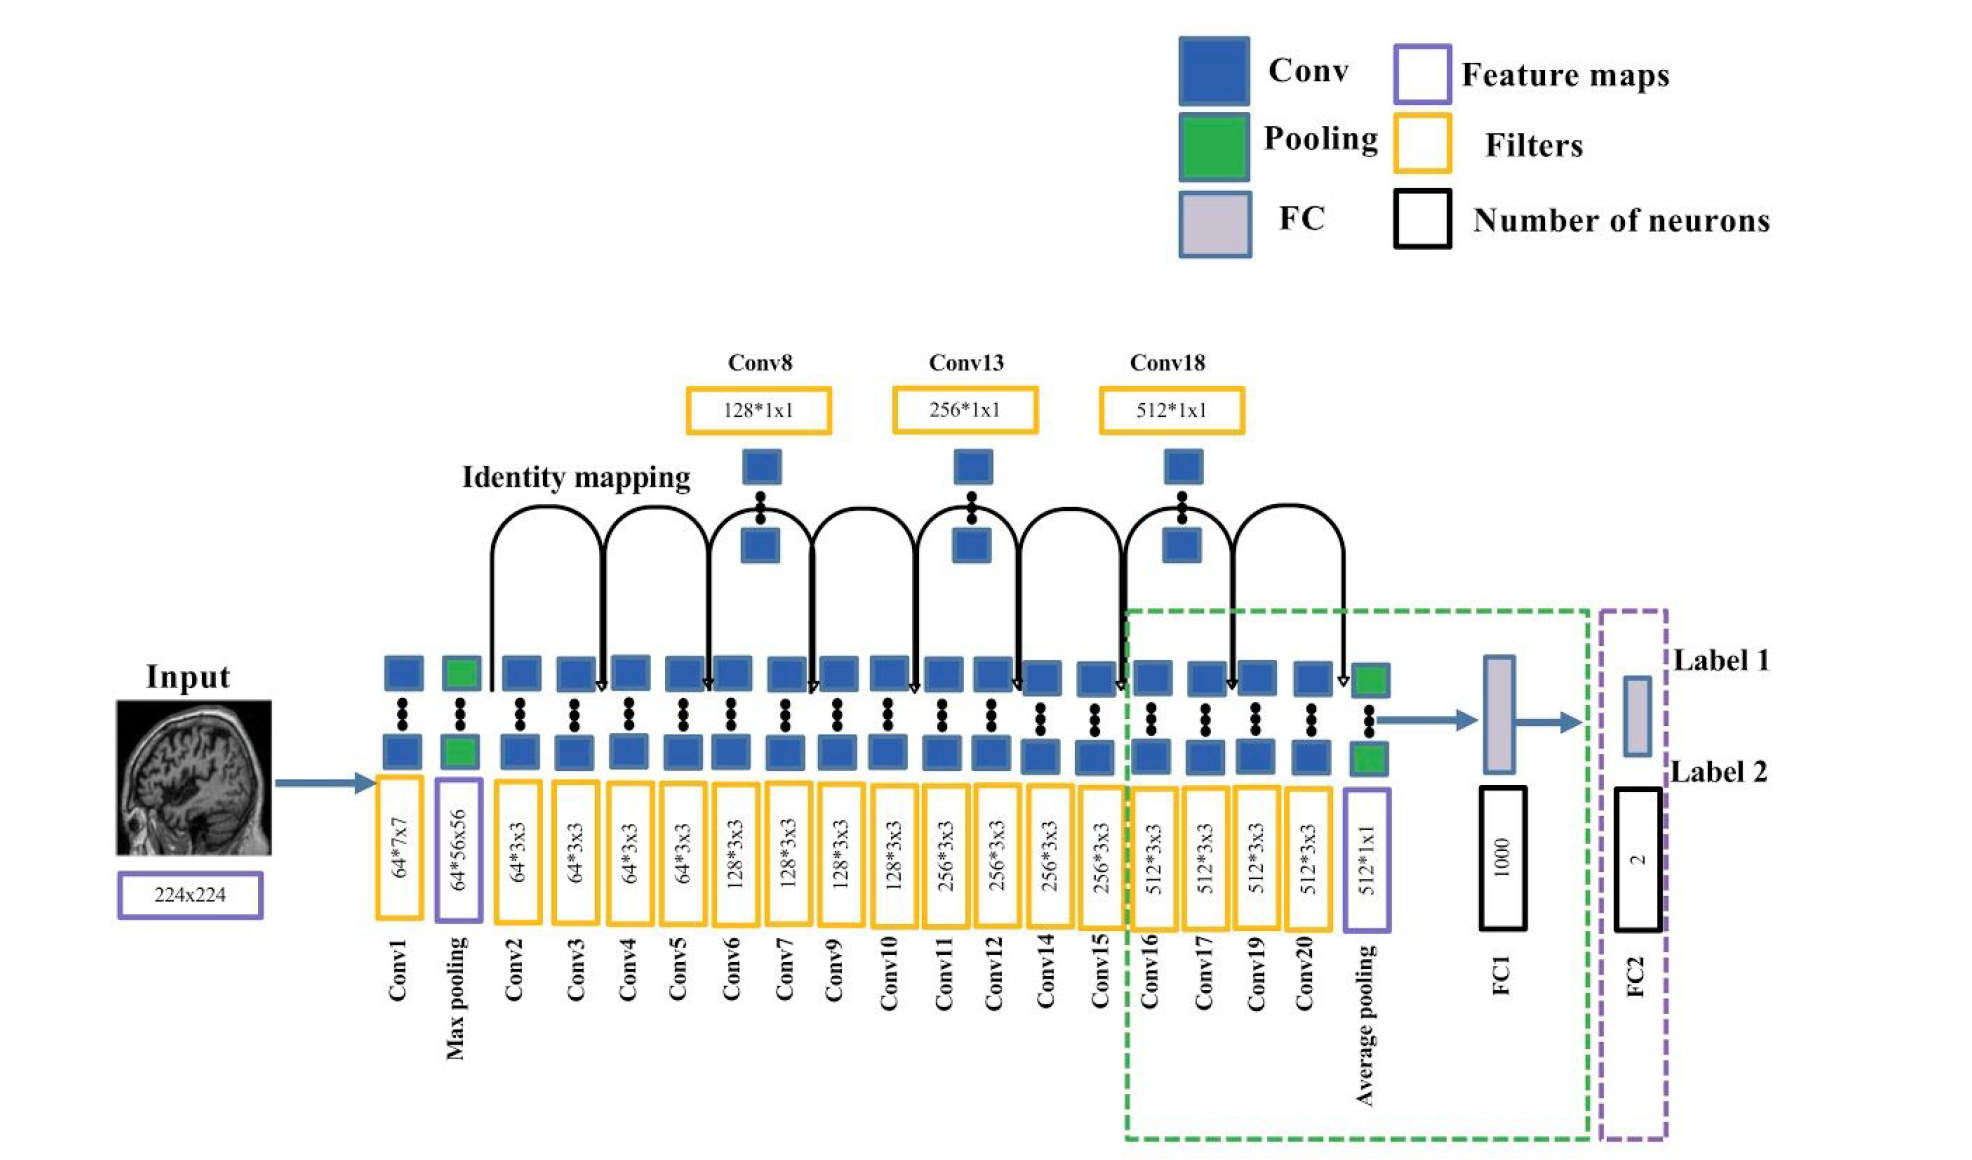
The 2D slice-level CNN in clinicadl is a slight modification of the ResNet-18 network used to train natural images on the ImageNet dataset:
One fully-connected layer was added at the end of the network to reduce the dimension of the output from 1000 to 2 classes (purple dotted box).
The last five convolutional layers and the last FC of ResNet are fine-tuned (green dotted box).
All other layers have their weights and biases fixed.
During training, the gradients update are done based on the loss computed at the slice level. Final performance metric are computed at the subject level by combining the outputs of the slices of the same subject.
The layers of this network (except the last one) are initialized with the weights of the ResNet-18 trained on ImageNet.
It is also possible to build autoencoders (see 3D patch-level & Roi based models section) but it is not possible on the only model provided in ClinicaDL for slices: ResNet-18
# 2D-slice single-CNN training
!clinicadl train slice cnn -h
#!clinicadl train slice cnn <caps_directory> "t1-linear" data/labels_lists/train results/slice_cnn resnet18 --n_splits 5
# 2D-slice multi-CNN training
!clinicadl train slice cnn -h
#!clinicadl train slice multicnn <caps_directory> "t1-linear" data/labels_lists/train results/slice_cnn resnet18 --n_splits 5
ll data
3D patch-level & ROI-based models
The 3D patch-level models compensate the absence of 3D information in the 2D slice-level approach and keep some of its advantages (low memory usage and larger sample size).
ROI-based models are similar to 3D-patch but take advantage of prior knowledge on Alzheimer’s disease. Indeed most of the patches are not informative as they contain parts of the brain that are not affected by the disease. Methods based on regions of interest (ROI) overcome this issue by focusing on regions which are known to be informative: here the hippocampi. In this way, the complexity of the framework can be decreased as fewer inputs are used to train the networks.
These two paradigms can be divided into two different frameworks:
single-CNN: one CNN is trained on all patch locations / all regions.
multi-CNN: one CNN is trained per patch location / per region. For multi-CNN the sample size is smaller (equivalent to image level framework), however the CNNs may be more accurate as they are specialized for one patch location / for one region.
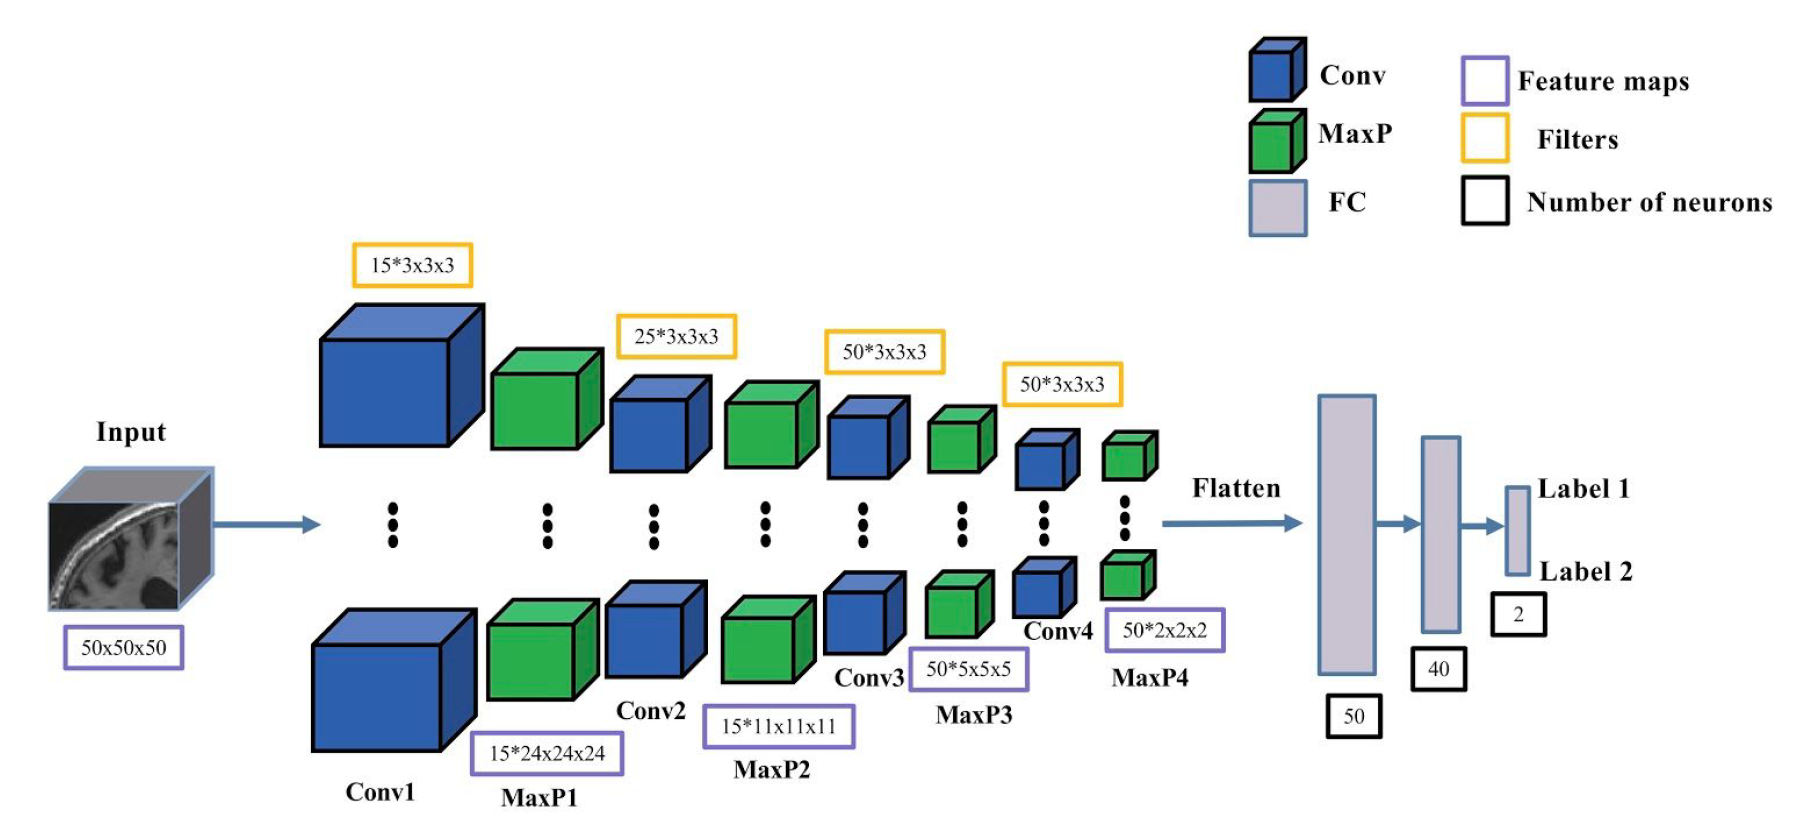
The 3D patch-level and ROI-based CNNs in clinicadl have the same architecture, including:
4 convolutional layers with kernel 3x3x3,
4 max pooling layers with stride and kernel of 2 and a padding value that automatically adapts to the input feature map size.
3 fully-connected layers.
As for the 2D slice-level model, the gradient updates are done based on the loss computed at the patch level. Final performance metrics are computed at the subject level by combining the outputs of the patches or the two hippocampi of the same subject.
It is possible for these categories to train an autoencoder derived from the CNN architecture. The encoder will share the same architecture as the CNN until the fully-connected layers (see the bakground section for more details on autoencoders construction).
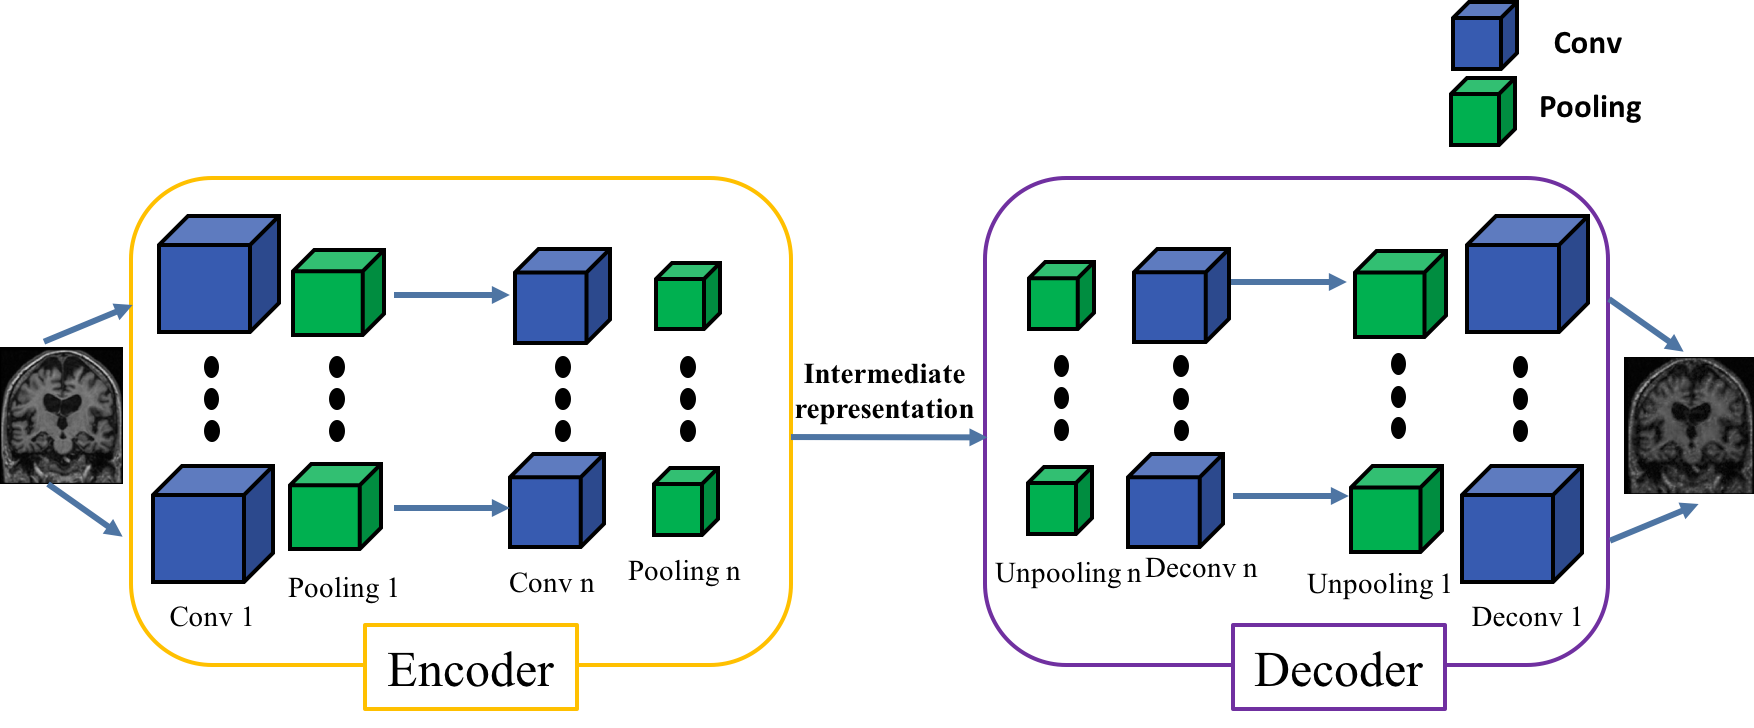
Then the weights of the encoder will be transferred to the convolutions of the CNN to initialize it before its training. This procedure is called autoencoder pretraining.
It is also possible to transfer weights between two CNNs with the same architecture.
For 3D-patch multi-CNNs specifically, it is possible to initialize each CNN of a multi-CNN:
- with the weights of a single-CNN,
- with the weights of the corresponding CNN of a multi-CNN.
Transferring weights between CNNs can be useful when performing two classification tasks that are similar. This is what has been done in (Wen et al., 2020): the sMCI vs pMCI classification network was initialized with the weights of the AD vs CN classification network.
Warning
Transferring weights between tasks that are not similar enough can hurt the performance!
3D-patch level models
See definition of patches in the background section on neuroimaging.
# 3D-patch autoencoder pretraining
!clinicadl train patch autoencoder -h
#!clinicadl train patch autoencoder <caps_directory> "t1-linear" data/labels_lists/train results/patch_autoencoder Conv4_FC3 --n_splits 5
# 3D-patch single-CNN training
!clinicadl train patch cnn -h

# With autoencoder pretraining
#!clinicadl train patch cnn <caps_directory> "t1-linear" data/labels_lists/train results/patch_single-cnn Conv4_FC3 --n_splits 5 --transfer_learning_path results/patch_autoencoder
# Without pretraining
#!clinicadl train patch cnn <caps_directory> "t1-linear" data/labels_lists/train results/patch_single-cnn Conv4_FC3 --n_splits 5
# 3D-patch multi-CNN training
!clinicadl train patch multicnn -h

# With autoencoder pretraining
#!clinicadl train patch multicnn <caps_directory> "t1-linear" data/labels_lists/train results/patch_multi-cnn Conv4_FC3 --n_splits 5 --transfer_learning_path results/patch_autoencoder
# With single-CNN pretraining
#!clinicadl train patch multicnn <caps_directory> "t1-linear" data/labels_lists/train results/patch_multi-cnn Conv4_FC3 --n_splits 5 --transfer_learning_path results/patch_single-cnn
# Without pretraining
#!clinicadl train patch multicnn <caps_directory> "t1-linear" data/labels_lists/train results/patch_multi-cnn Conv4_FC3 --n_splits 5
ROI-based models
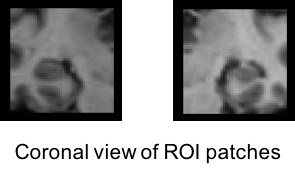
ROI inputs correspond to two patches of size 50x50x50 manually centered on each hippocampus. They cannot be pre extracted with clinicadl preprocessing extract-tensor and are computed from the whole MR volume.
# ROI-based autoencoder pretraining
!clinicadl train roi autoencoder -h
#!clinicadl train roi autoencoder <caps_directory> "t1-linear" data/labels_lists/train results/roi_autoencoder Conv4_FC3 --n_splits 5
# ROI-based CNN training
!clinicadl train roi cnn -h

# With autoencoder pretraining
#!clinicadl train roi cnn <caps_directory> "t1-linear" data/labels_lists/train results/roi_cnn Conv4_FC3 --n_splits 5 --transfer_learning_path results/roi_autoencoder
# Without pretraining
#!clinicadl train roi cnn <caps_directory> "t1-linear" data/labels_lists/train results/roi_cnn Conv4_FC3 --n_splits 5
# ROI-based multi-CNN training
!clinicadl train roi multicnn -h

# With autoencoder pretraining
#!clinicadl train roi multicnn <caps_directory> "t1-linear" data/labels_lists/train results/patch_multi-cnn Conv4_FC3 --n_splits 5 --transfer_learning_path results/patch_autoencoder
# With single-CNN pretraining
#!clinicadl train roi multicnn <caps_directory> "t1-linear" data/labels_lists/train results/patch_multi-cnn Conv4_FC3 --n_splits 5 --transfer_learning_path results/patch_single-cnn
# Without pretraining
#!clinicadl train patch multicnn <caps_directory> "t1-linear" data/labels_lists/train results/patch_multi-cnn Conv4_FC3 --n_splits 5
3D-image level model
In this approach, the whole MRI is used at once and the classification is performed at the image level. The advantage is that the spatial information is fully integrated, and it may allow the discovery of new knowledge on the disease. However, it requires more computational resources (especially GPU with higher memory capacity).
The 3D image-level CNN in clinicadl is designed as follows:
5 convolutional layers with kernel 3x3x3,
5 max pooling layers with stride and kernel of 2 and a padding value that automatically adapts to the input feature map size.
3 fully-connected layers.
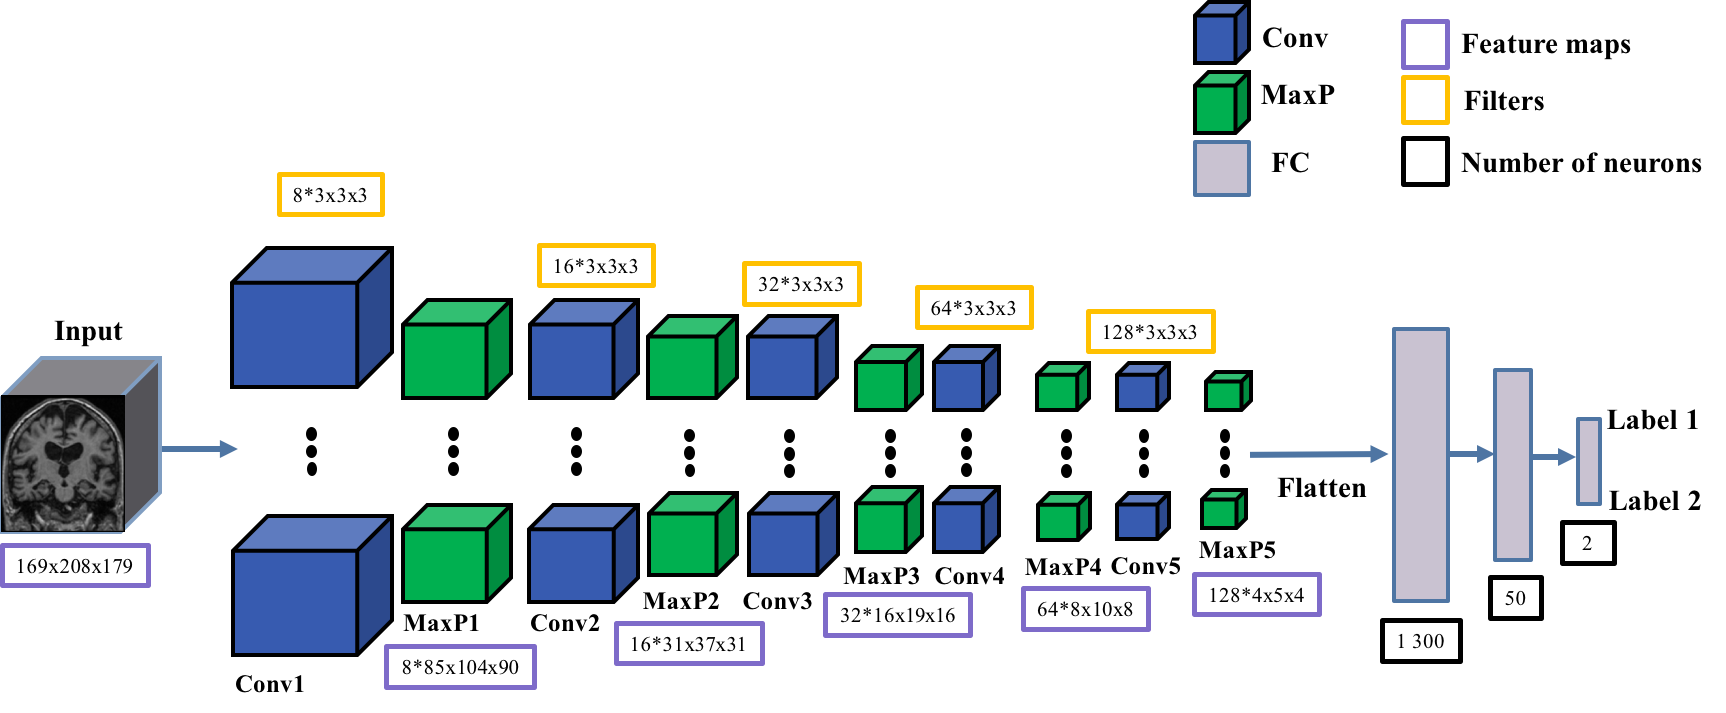
Depending on the preprocessing, the size of the fully connected layers must be adapted. This is why two models exist in clinicadl:
Conv5_FC3adapted tot1-linearpreprocessing,Conv5_FC3_mniadapted tot1-extensivepreprocessing (coming soon in next releases of clinicadl).
It is possible for this category to train an autoencoder derived from the CNN architecture, or to transfer weights between CNNs. See the section on patches for more details on this topic!
# 3D-image level autoencoder pretraining
!clinicadl train image autoencoder -h
#!clinicadl train image autoencoder <caps_directory> "t1-linear" data/labels_lists/train results/image_autoencoder Conv5_FC3 --n_splits 5
# 3D-image level autoencoder pretraining
!clinicadl train image cnn -h

# With autoencoder pretraining
#!clinicadl train image cnn <caps_directory> "t1-linear" data/labels_lists/train results/image_cnn Conv5_FC3 --n_splits 5 --transfer_learning_path results/image_autoencoder
# Without pretraining
#!clinicadl train image cnn <caps_directory> "t1-linear" data/labels_lists/train results/image_cnn Conv5_FC3 --n_splits 5
Customize your experiment!
You want to train your custom architecture, with a custom input type or preprocessing on other labels? Please fork and clone the github repo to add your changes.